What is Roblox Studio?
It’s the tool from the Roblox Corporation used by game developers to create and publish games to the Roblox platform. The program allows you to build creations and use Lua scripting to bring them to life. All games on Roblox’s platform are created in Roblox Studio by people like you and it’s free to get started.
Once you’ve learned the basics, you’ll be confident in your ability to do and achieve more with it. Getting to grips with it will offer you a better chance of creating awesome games. The programming language used in Roblox Studio is a LUA, and is easy to learn, with practice. Before long, you can be creating your own games, complete with extras such as game passes and in-game upgrades for the players to purchase with Robux. Using Studio is a must if you want to move into game development on Roblox and build extra functionality into your games.
Can I get Roblox Studio on Chromebook?
Unfortunately, Roblox Studio is unavailable on Linux and Chromebooks, however you are able to play Roblox games on a Chromebook using Chrome OS.
Where To Download
Just before we get started, there’s a chance that if you’ve played a Roblox game before, Roblox Studio may already be installed on your PC. To check this, on a Windows PC click Start and search for “Roblox Studio”. On a Mac, check your Applications folder in the Finder to see if it’s there.
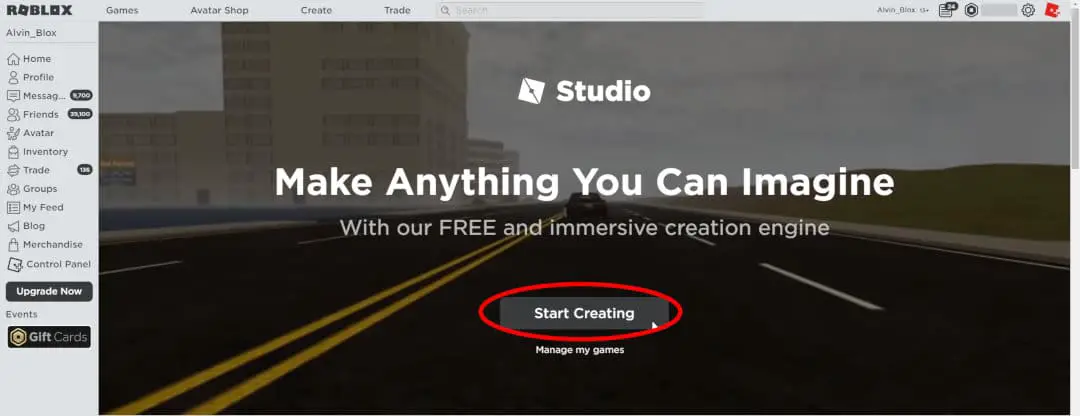
If not, don’t worry! There are many different ways you can get to finding the Roblox Studio installer. The easiest way is to head to https://www.roblox.com/create and click on the Start Creating button. This will prompt you to install the Studio application. Your browser may ask you to confirm this, so make sure to accept any pop up which asks to install Studio.
Don’t forget that roblox.com is the only place where you can download Roblox Studio so only ever dowload from there.
If you’re interested in learning how to use the program to the best of its capability so you can start making your own awesome Roblox games, check out my Roblox scripting videos here If you’ve ever played a Roblox game before, there’s a high chance that Roblox Studio has already come pre-installed on your PC with the Roblox Player application. Do a search on your computer before you download Studio to see if you already have it installed.
How To Get Started
Now that you’ve installed Roblox Studio, go ahead and open it up. You’ll be asked to sign into your Roblox account, so make sure you do that. You may also hit a CAPTCHA check to make sure you’re not a robot.
Now that you’re logged in, you should see this templates page. This page allows you to pick a template to start building your games off of. Go and select the Baseplate template. We will not be using other templates for now.
Roblox Studio Editor Tools and Features
Explorer Panel
The Explorer panel is used to show all of the objects in your game, in a list view. Some objects can be inside of another object, and this is called the object hierarchy.
An object can be a child or a parent of another object. For example, the Baseplate is a child of the Workspace as it is inside of it. (The Workspace is where all visible objects in the game are stored).
Another way of saying this is that the Workspace is the parent of the Baseplate.
So a parent object is an object that has another inside of it. A child is an object that is inside of another. Think of it like a parent in real life, who looks after a child.
Properties Panel
The Properties panel is used to customise objects and edit their behaviour in game.
For example, if you wanted to change the color of a part, you would select if in the Explorer window and then change its appearance or behaviour in the properties panel.
A property is something that can be changed to alter the way an object behaves or looks.
Some example properties include Transparency (whether an object is clear or not), Color, Size, Position and Reflectance, although there are lots of different properties for each object.
Toolbox Panel
The Toolbox is another important panel in Studio. This panel allows you to insert other objects created by the Roblox developer community. You can insert models (an object or collection of various Roblox objects, e.g. a fighter jet or a pre-made script that does something), images (uploaded by the community to use on Decals, Textures and GUI image elements), sounds (used for Sound objects to play audio), meshes (used in Meshes or MeshParts to create more advanced models) and Plugins (used to enhance workflow in Studio – I’ll write more about plugins at a later date). The primary use of the toolbox for most new developers is just to insert models and images.
An example of a trusted source is one which has the orange tag on the model icon (as shown in the image). This means that the model has been vetted by Roblox, so you can be sure that their models will not contain any malicious objects.
Ribbon Menu
There are lots more tools in Studio for use when designing your game. Most of these tools can be found in the menu at the top of your screen, called the Ribbon Menu. Similar to other programs such as the Microsoft Office suite of programs, the Ribbon Menu at the top separates key tools into different categorised tabs allowing you to easily and quickly navigate to your desired tool.
Select, Move, Scale & Rotate functions
The first four tools are the Select, Move, Scale and Rotate tools.
These tools are used for manipulating objects that are in your game.
The Select tool allows you to select an object in the game world. Once you select an item, it will be highlighted in blue in the world but also in the Explorer window.
Try it out if you like, insert a model from the Toolbox and then click to select it using the Select tool!
Clicking an object will automatically use the Select tool.
An alternative way of selecting this tool is to press Ctrl + 1 on a PC, or Cmd + 1 on a Mac.
You can also click and drag the object to move it around in the game world.
Moving the Camera
Don’t forget, you can move the camera in the game world by pressing the WASD or arrow keys on your keyboard. You can also rotate the camera by holding down the right mouse button and moving your mouse.
Moving around
The recommended way to move around in Studio is to use the arrow keys and right mouse button at the same time.
This allows you to easily move the camera to where you want it to go. If you want to quickly focus on an object, you can select it in the Explorer panel and then press F on your keyboard.
This will focus the camera to that object, and is especially handy if you’ve got lots of objects in your game and a large map, and you’ve forgotten where you’ve put that specific object.
Selection Tool
The Move tool is similar to the Select tool, you can still select items with it, but it allows you to move an item more precisely along three axes, X, Y and Z.
The Y axis (green) allows you to move an item up or down. The X and Z axes allow you to move an object sideways.
Each axis has a number which represents how far away it is from the centre of the game world (co-ordinates 0,0,0 – one for X, one for Y, one for Z). These three number values can then be combined to generate a co-ordinate for a specific position in the game. For example, if I wanted to move the barrel to the edge of the map, its X,Y and Z values would make up a co-ordinate which would be at the edge of the map.
As you move an object, its position property will change. Not all objects have a position property – only Parts and MeshParts do. A model does not have a position property as it is a container of parts / objects – which have their own per part as each part may be in a different position to each other.
The final of the first four main tools you need to know about in Studio is the rotate tool.
This tool, again similar to the others, has three different axes, X, Y and Z, and allows you to select and rotate your object along each one. You can select the degree interval that you want to rotate the object along in the Snap to Grid panel in the “Model” tab if you want to refine your rotation.
You can also press Ctrl + R to rotate the object at 90 degree intervals, or Ctrl + T to tilt it at a 90 degree interval. If you’re on a Mac, it will be Cmd + R or Cmd + T.
How to get Studio on a iPad/Tablet
Right now, the program is only available on Windows and Mac computers, which means you currently can not get Studio on your iPad or tablet. If you really want to use Roblox Studio on your iPad, there are various hacky ways you can do so, such as remotely logging into a computer if you have one from your iPad by using a program like TeamViewer.
I explain more about this method at this post here:
Rendering Settings – what should I use?
You may be wondering what rendering settings (graphics mode) are in Studio – you’ll find the setting in the settings panel of Studio, found by going to File > Settings.
This panel is used to determine the quality of the rendering done by your graphics card to show your game world. A lower setting will mean reduced quality of how your game looks, and a high setting will mean a higher quality and more detailed world. When you’re in Studio, your computer has to work hard to render the game, so that you can see it and move around in the game world.
If you are experiencing lag in Studio, consider turning this down to a low level. This will mean that your computer has less work to do when rendering the game world view, which means Studio should run faster.
You have two different settings: EditLevel and EditQualityLevel.
Saving Your Games/Projects
In Studio there are two ways that you can save your games/projects to the Roblox platform. You can save a project locally to your computer just as you would do with other documents. You can also publish your project to Roblox’s servers in the cloud.
This means that you will be able to access your games/projects from other computers that you’re logged in to Roblox in, which is great if you use multiple computers or access Roblox from multiple different locations. It’s recommended that you use both methods in case either go down and lose your data. If your computer breaks down or there’s a disaster which wipes your data, you’ll have a backup in your Roblox publish.
You can also access old versions of your place that you published to the Roblox platform. In case you make a mistake or break your game, you can revert it back to a previous version to restore any damage you have done.
To do this, head to your Roblox place’s game page, click the three dots next to the title and click Configure Place. You can then click on the “Version History” tab to access all the published versions available to revert to. Select the version you wish to revert to, and then open your place again in Studio.
In order to publish and confirm your revert, you will need to open your place and publish it to Roblox as a new version. This is because right now, you have only reverted your Studio – if someone plays your game they will still see the current non-revered version. So open the place up in Studio and go to File > Publish to see those changes take effect in your game.
Getting Help & Support
Don’t forget, if you’re having trouble getting your Studio to work, you can contact Roblox’s technical support team by filling out the form here:
The technical support team are well equipped to deal with all of your Studio queries and should get back to you via e-mail within a few days.
Not Responding
If Studio is not responding, don’t panic. Just leave your Studio window open and don’t click or press any keys to try and restore it. Just wait patiently for a few minutes. The most usual cause of the not responding issue happens when you make Studio carry out a huge task, such as inserting a model full of lots of objects or running a particularly intensive script.
The default save time is 5 minutes, so check your AutoSaves or RecentSaves file to check if there’s any work there that can be restored. The AutoSaves and RecentSaves are stored in your Documents folder under Roblox. These are accessible from the File Explorer on Windows and the Finder window on a Mac.
Commonly searched problems with Studio include:
- Not responding
- Won’t open
- Error code 6
- Login problems
- Mouse glitches
- Permission errors
- Toolbox not loading
- Plugins not showing
- Keeps crashing
- Laggy/lagginess
I hoped you found this Roblox Studio guide useful. The Roblox platform is a great opportunity to create wonderful and exciting games from your own imagination. Players will reward well thought out game creation by returning to play time and time again, and even purchase your in-game offerings.
For further tutorials including how to make your own games in Studio as well as new updates, check out my channel or Roblox’s own resources at https://developer.roblox.com/en-us/.
Keep scripting!